
🎙️ Voice-Controlled PPT & PDF Controller using ESP32 + VC-02 + Xiao S3

🔰 Introduction
In today’s smart world, hands-free control is becoming essential for productivity and accessibility. Imagine delivering a presentation without touching your laptop — simply using voice commands to navigate slides or scroll through PDFs.
In this project, I built a voice-controlled presentation system using:
VC-02 Voice Recognition Module
Seeed Studio Xiao ESP32-S3
ESP32
This system allows you to control PowerPoint slides and PDF documents using simple voice commands like:
|
👉
“Next slide” |
👉
“Start presentation”
👉 “Slide Show start” 👉 “End Slide Show” |
👉
“Scroll Up” 👉 “Scroll Down” 👉 “Next Tab” 👉 “previous Tab” |
🎯 Project Objective
The goal of this project is to create a wireless voice-controlled interface that can:
Control PowerPoint presentations
Navigate PDF documents
Reduce dependency on keyboard/mouse
Improve accessibility for users with physical limitations
Enhance smart classroom and seminar environments
🧰 Components Used
|
Component |
Description |
|
ESP32 |
Main controller for communication |
|
Xiao ESP32-S3 |
Handles USB HID / command interface |
|
VC-02 Voice Module |
Recognizes voice commands |
|
Laptop/PC |
Runs PPT/PDF |
|
USB Cable |
Programming & power |
⚙️ How It Works
Step-by-Step Working
User speaks a command.
VC-02 module recognizes the command.
Command is sent to ESP32. (UART)
ESP32 processes and sends control signals to Xiao ESP32-S3. (Via Bluetooth)
Xiao ESP32-S3 acts as a USB HID keyboard.
Laptop receives keystrokes to control PPT/PDF.
🗣️ Supported Voice Commands
|
Voice Command |
Action |
|
Next Slide |
Right Arrow |
|
Previous Slide
|
Left Arrow |
|
Start Presentation |
F5 |
|
Start Presentation from current slide |
Shift +F5 |
|
Exit Presentation |
Esc |
|
Scroll Down |
Page Down |
|
Scroll Up
|
Page Up |
|
Next Tab |
Tab |
|
Back Tab |
Shift+Tab |
You can customize commands in the VC-02 module.
🧠 Why Xiao ESP32-S3?
The Xiao ESP32-S3 supports USB HID, which allows it to act like a keyboard or mouse. This makes it perfect for sending control commands to a computer.
🎥 Watch the Full Video
👉 Embed your YouTube video here.
Example:
<iframe width="560" height="315" src="YOUR_VIDEO_LINK"></iframe>
🔧 Components Information
\
1️⃣ ESP32
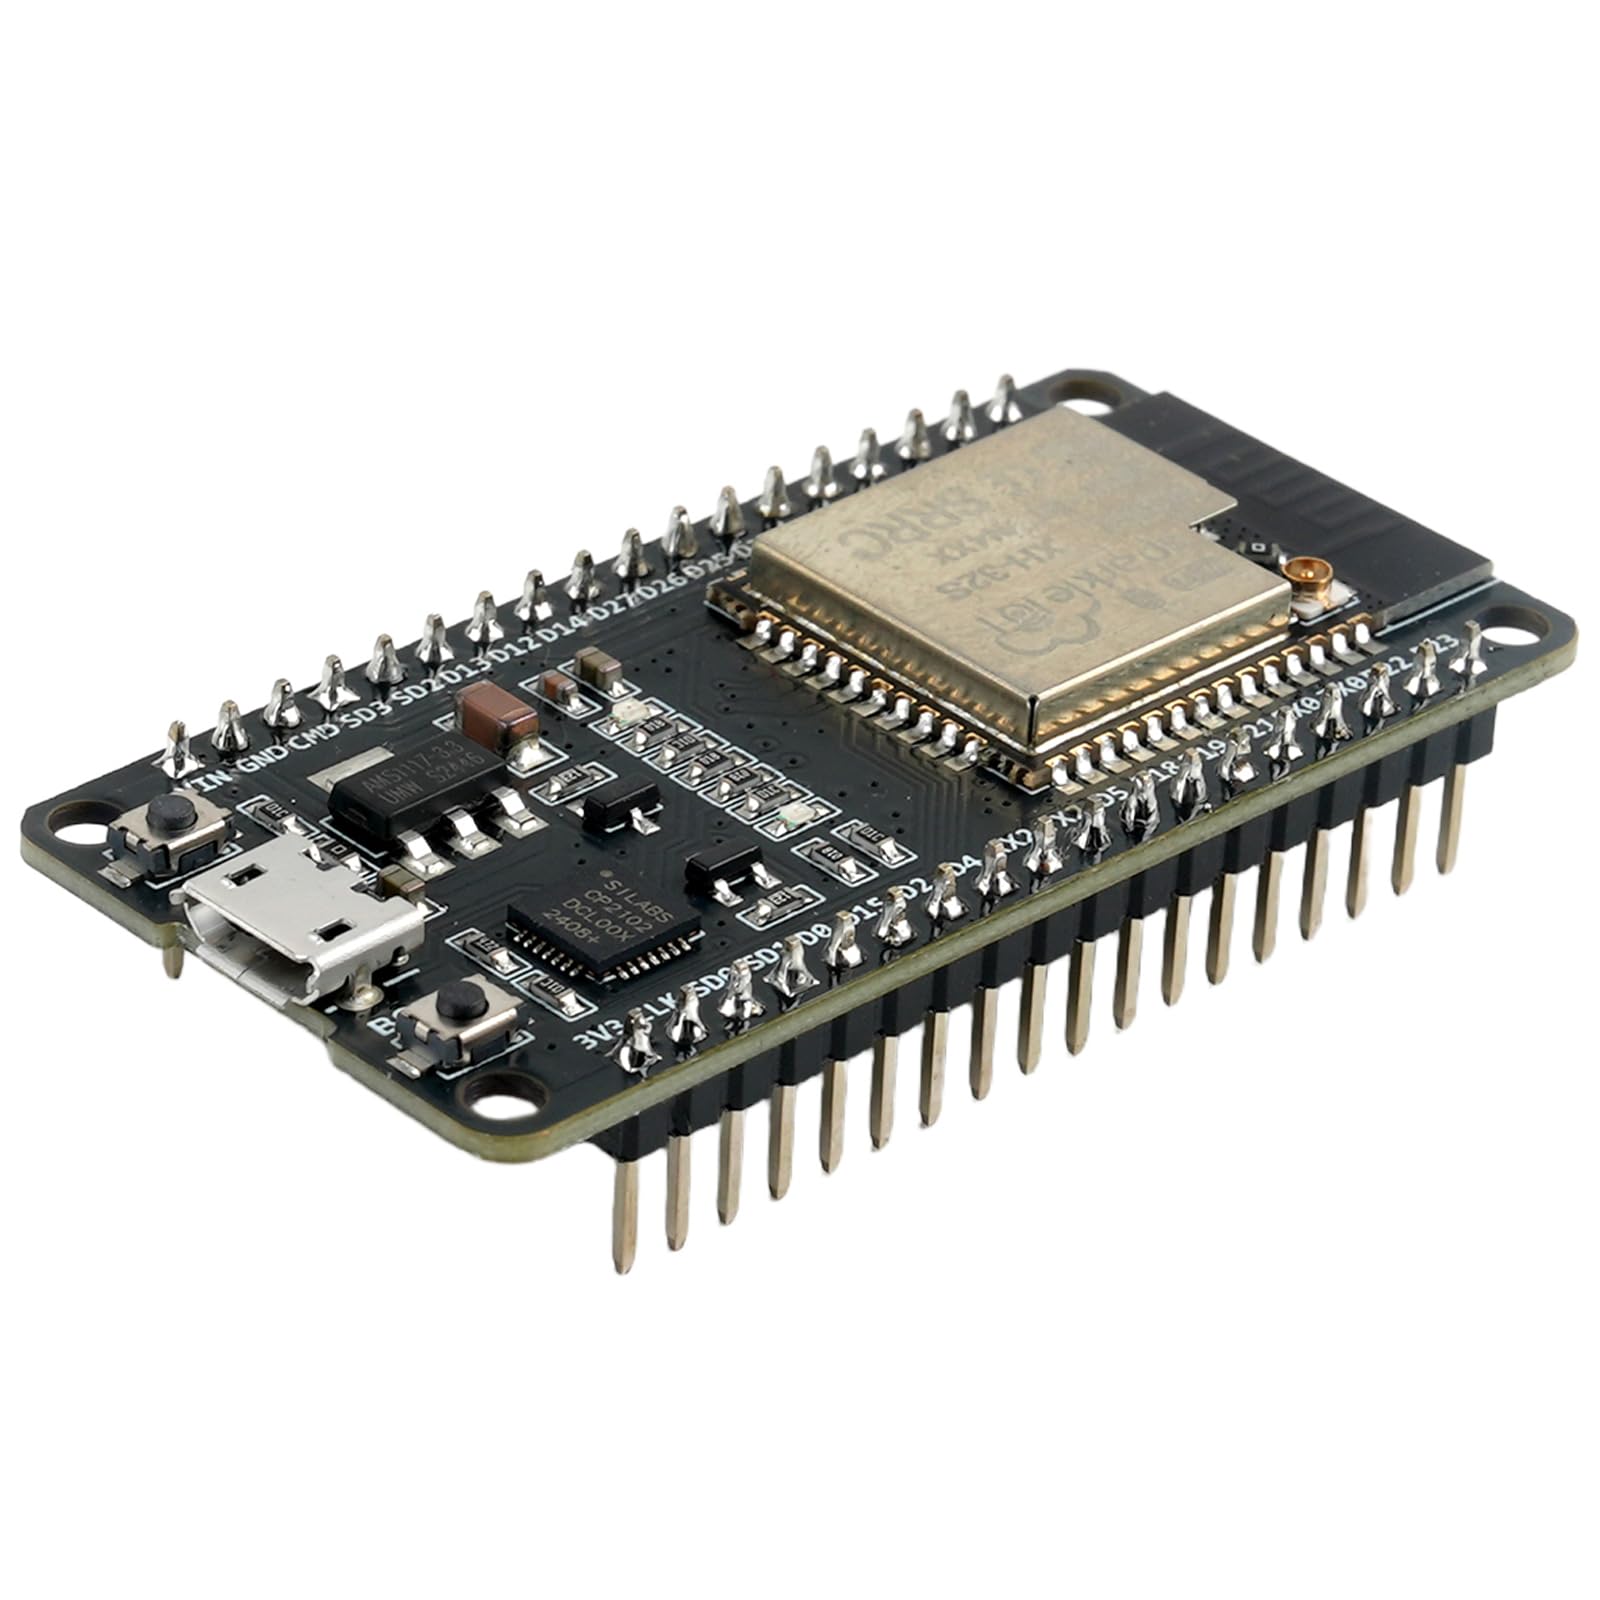
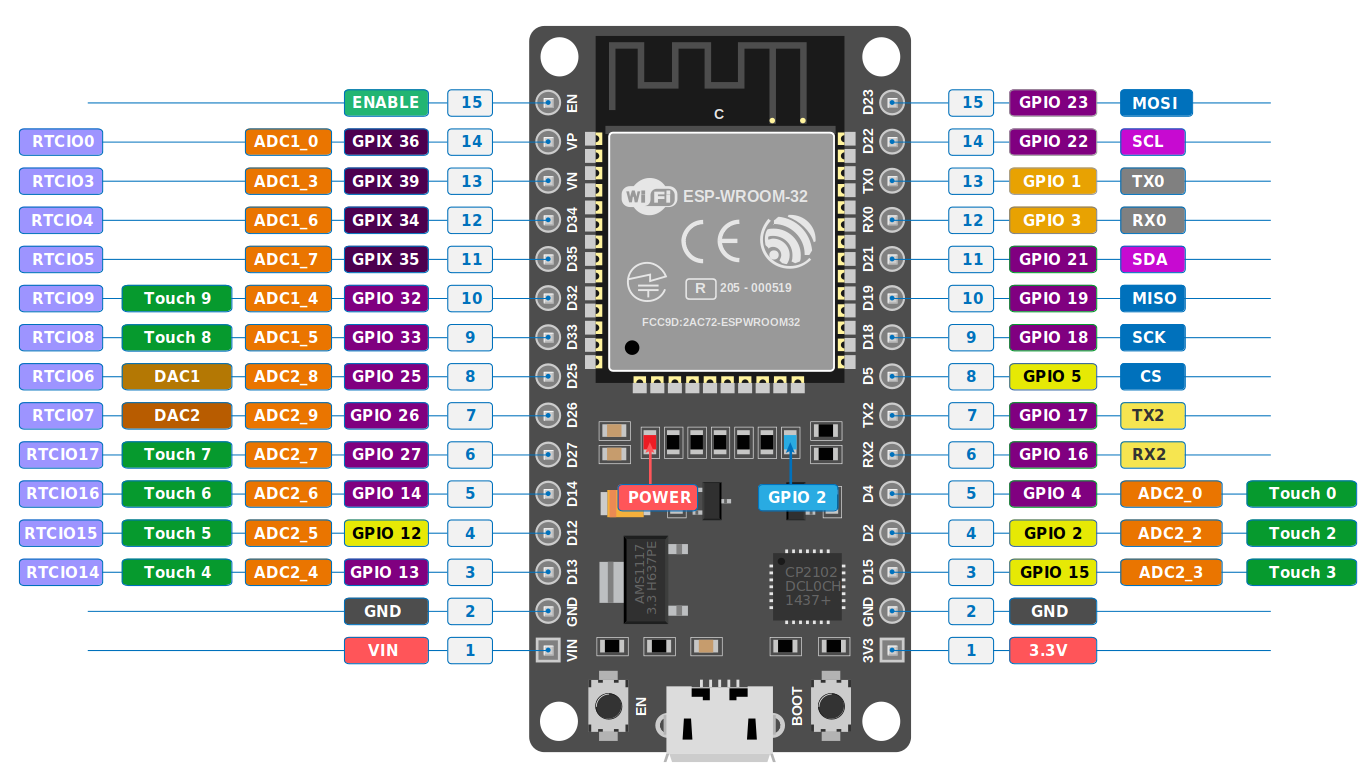
The ESP32 is a powerful microcontroller with built-in Wi-Fi and Bluetooth capabilities. It acts as the main controller in this project, handling communication between the voice module and the Xiao ESP32-S3.
🔹
Key Features
|
🔹
Role in This Project
|
2️⃣ VC-02 Voice Recognition Module

Overview
The VC-02 is an offline voice recognition module capable of recognizing predefined voice commands without internet connectivity.
|
🔹
Key Features
|
🔹
Role in This Project
Enables hands-free control |
3️⃣ Seeed Studio Xiao ESP32-S3

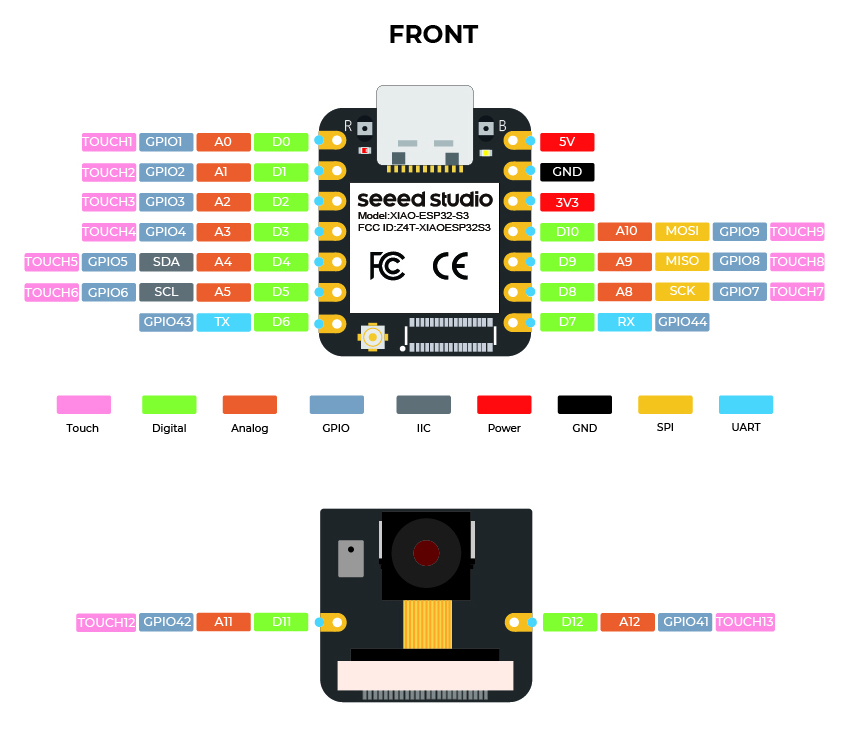
Overview
The Xiao ESP32-S3 is a compact and powerful microcontroller with USB HID support, allowing it to act as a keyboard or mouse.
|
🔹
Key Features
|
🔹
Role in This Project
|
🧩 How These Components Work Together
👉 VC-02 listens for voice commands
👉 ESP32 processes the command
👉 Xiao ESP32-S3 sends keyboard signals
👉 Laptop executes the action
Now guys lets see One by one how to make this project.
Circuit Diagrame:

FIRMWARE FOR VC02 :
Before using the VC-02 voice recognition module in this project, the first step is to configure its firmware and train it with the voice commands you want it to recognize. The VC-02 works completely offline, but it can only detect commands that have been stored in its memory.
To begin, connect the VC-02 module to your computer using a USB-to-TTL converter and open the configuration software provided with the module. After selecting the correct COM port and baud rate, you can start adding and training voice commands such as “Next Slide” or “Previous Slide.” Each command is saved with a unique ID, which the ESP32 later reads through serial communication.
Once the training process is complete and the commands are stored in the module, the VC-02 is ready to be integrated into the system for real-time voice control.
Lets see the all the Steps for the Creating the firmware.
Step 1: Goto the http://voice.ai-thinker.com

Step 2: Click on the Create Product

Step 3: Click on 'Lamp', or you can choose any lamp option. I have chosen the 'Table Lamp'

Step 4: Click on Offline

Step 5: Click on the VC02 module

Step 6: Type your Project Name and choose the langauge as a English then click on Save.

Step 7: Please refer to the images and replicate the steps exactly as demonstrated.


https://docs.ai-thinker.com/en/vc/


Click on upload button and now press the Reset button of the Vc02 module. and after that the firmware start to uploading.

Now all set about the VC02 module now let’s see about ESP32 Copy the code and upload to ESP 32 do not need to any change
/*
  Subscribe to www.youtube.com/theelectronicscreator

  following is the Cnnection of the ESP32 with the VC02 Module

ESP RXD2 16  to the pin B7 of the VC02 Module
ESP TXD2 17  to the pin B6 of the VC02 Module
ESP GND to the GND pin of the VC02 Module
VCC  --> VCC

I hope you learned something new from this video.
Thanks for choosing The Electronics Creator!
*/

#include <BLEDevice.h>
#include <BLEScan.h>
#include <BLEAdvertisedDevice.h>

#define RXD2 16
#define TXD2 17

#define SERVICE_UUID        "12345678-1234-1234-1234-1234567890ab"
#define CHARACTERISTIC_UUID "abcd1234-1234-1234-1234-abcdef123456"

BLEClient* pClient = nullptr;
BLERemoteCharacteristic* pRemoteCharacteristic = nullptr;
bool connected = false;

// BLE connection callbacks
class ClientCallbacks : public BLEClientCallbacks {
  void onConnect(BLEClient* client) {
    connected = true;
    Serial.println("BLE Connected to XIAO");
  }
  void onDisconnect(BLEClient* client) {
    connected = false;
    Serial.println("BLE Disconnected");
  }
};

void setup() {
  Serial.begin(115200);
  Serial2.begin(9600, SERIAL_8N1, RXD2, TXD2);

  Serial.println("ESP32 VC-02 → BLE Sender");

  BLEDevice::init("ESP32_VC02_Sender");

  BLEScan* scan = BLEDevice::getScan();
  scan->setActiveScan(true);

  BLEScanResults* results = scan->start(5);

  for (int i = 0; i < results->getCount(); i++) {
    BLEAdvertisedDevice device = results->getDevice(i);

    if (device.getName() == "XIAO_HID_Keyboard") {
      pClient = BLEDevice::createClient();
      pClient->setClientCallbacks(new ClientCallbacks());
      pClient->connect(&device);

      BLERemoteService* service = pClient->getService(SERVICE_UUID);
      if (service) {
        pRemoteCharacteristic = service->getCharacteristic(CHARACTERISTIC_UUID);
        Serial.println("Ready to send VC-02 commands");
      }
      break;
    }
  }
}

void loop() {
  if (!connected) return;

  // VC-02 sends 2 bytes: A1 + command
  if (Serial2.available() >= 2) {
    byte header = Serial2.read();   // A1
    byte command = Serial2.read();  // actual command

    if (header != 0xA1) return;

    char sendKey = 0;

    switch (command) {
      case 0x66: sendKey = 'z'; break; // start slideshow
      case 0x77: sendKey = 'x'; break; // slideshow from current
      case 0x99: sendKey = 'c'; break; // next slide
      case 0x11: sendKey = 'v'; break; // previous slide
      case 0x88: sendKey = 'b'; break; // exit slideshow
      case 0x22: sendKey = 'n'; break; // app switch
      case 0x33: sendKey = 'm'; break; // reverse app switch
      case 0x44: sendKey = 'a'; break; // scroll up
      case 0x55: sendKey = 's'; break; // scroll down
      default: return;
    }

    pRemoteCharacteristic->writeValue((uint8_t*)&sendKey, 1);

    Serial.print("VC-02 Cmd: 0x");
    Serial.print(command, HEX);
    Serial.print(" → Sent: ");
    Serial.println(sendKey);
  }
}
Now following is the code for the XIAO S3 module
/*
  Subscribe to www.youtube.com/theelectronicscreator
for this code we are using the XIAO S3 module beasause of the HID comatibilities in the XIAO board
I hope you learned something new from this video.
Thanks for choosing The Electronics Creator!
*/


#include <USB.h>
#include <USBHIDKeyboard.h>
#include <USBHIDMouse.h>
#include <BLEDevice.h>
#include <BLEServer.h>
#include <BLEUtils.h>

USBHIDKeyboard Keyboard;
USBHIDMouse Mouse;

#define SERVICE_UUID "12345678-1234-1234-1234-1234567890ab"
#define CHARACTERISTIC_UUID "abcd1234-1234-1234-1234-abcdef123456"

class KeyCallback : public BLECharacteristicCallbacks {
  void onWrite(BLECharacteristic *pChar) {
    String value = pChar->getValue();
    if (value.length() == 0) return;

    char cmd = value[0];

    switch (cmd) {

      // ---------- POWERPOINT ----------
      case 'z': Keyboard.write(KEY_F5); break;

      case 'x':
        Keyboard.press(KEY_LEFT_SHIFT);
        Keyboard.write(KEY_F5);
        Keyboard.releaseAll();
        break;

      case 'c': Keyboard.write(KEY_RIGHT_ARROW); break;
      case 'v': Keyboard.write(KEY_LEFT_ARROW); break;
      case 'b': Keyboard.write(KEY_ESC); break;

      // ---------- APP SWITCH ----------
      case 'n':
        Keyboard.press(KEY_LEFT_ALT);
        Keyboard.press(KEY_TAB);
        delay(80);
        Keyboard.releaseAll();
        break;

      case 'm':
        Keyboard.press(KEY_LEFT_ALT);
        Keyboard.press(KEY_LEFT_SHIFT);
        Keyboard.press(KEY_TAB);
        delay(80);
        Keyboard.releaseAll();
        break;

      // ---------- SCROLL ----------
      case 'a': Mouse.move(0, 0, 1); break;   // scroll up
      case 's': Mouse.move(0, 0, -1); break;  // scroll down
    }
  }
};

void setup() {
  USB.begin();
  Keyboard.begin();
  Mouse.begin();

  BLEDevice::init("XIAO_HID_Keyboard");
  BLEServer *pServer = BLEDevice::createServer();

  BLEService *pService = pServer->createService(SERVICE_UUID);

  BLECharacteristic *pCharacteristic =
    pService->createCharacteristic(
      CHARACTERISTIC_UUID,
      BLECharacteristic::PROPERTY_WRITE);

  pCharacteristic->setCallbacks(new KeyCallback());
  pService->start();

  BLEDevice::getAdvertising()->start();
}

void loop() {
  // event-driven
}
Now for the demo of the project see the video
Conclusion:
This project demonstrates how voice recognition and microcontrollers can transform everyday tasks like presentations into a seamless, hands-free experience. By combining ESP32, Xiao ESP32-S3, and VC-02, we can build a powerful yet affordable voice-controlled system suitable for classrooms, offices, and assistive technology.
🔖 SEO Keywords
voice controlled presentation
ESP32 voice control project
Xiao ESP32 S3 HID keyboard
VC-02 voice recognition module project
hands free PowerPoint control
smart classroom automation


